Thursday, January 26, 2012

From Plain to Dame!

Week 3 of 11 this quarter and the homework is piling on!  I'm glad I go this done before the real swarm of design homework projects began.  This quarter has a full blown holistic day spa design (start to finish), learning all about building codes, how to make pretty presentations, and learning a whole new computer design program.  My career as a designer is becoming more real and I feel like my talents are growing!

To keep my sanity, I must have something completely under my control at home that I can call mine and work on when I want to.  So, here's another of my fabulous garage finds I found recently.  I got this two drawer nightstand along with a coffee table (not completed yet).  The top drawer originally looked like the bottom one, but I was experimenting with the Pottery Barn Finish you can see applied here.


So it started out looking like a "plain jane" nightstand you can find at any Target for cheap and I thought I would dress it up a bit.


I went to Al's Hardware and Materials out in AJ and picked up some pretty sweet trim and base boards for $10.  I got to use my air compressor and miter box (cuz I'm too cheap to by a miter saw) I got for Christmas!  This is exactly the project I had in mind when I asked for them :)


Here's her reveal!  I stuck with the same hardware because it was the nicest thing on the piece.  


Linked up:
Remodelaholic  Thirty Handmade Days   504 Main   It's a Hodge Podge Life   
Fingerprints on the Fridge   Miss Mustard Seed   A Little Inspiration   House of Hepworths
A Glimpse Inside   Creations by Kara

Sunday, January 22, 2012

Winner Winner Chicken Dinner!

Okay, there's no chicken dinner other than the one my husband is so kindly cooking up for our Sunday dinner.  Time to announce the winner of my first giveaway.  Thanks to those of you who entered/followed/"Liked" the Giveaway.

I hopped onto the first random number generator I could google and here are the results!


So we go to the 12th entry and we find:


Congratulations Hollister :) I'll be contacting you with details on your tickets.

Thanks again everyone for participating.  Don't worry, there will be more in the future!


Wednesday, January 18, 2012

Potty Pops anyone?

A lot of my friends are going through potty training with their kids right now.  So am I . . . kind of.  With my busy schedule it's hard to keep any kind of consistency with my 3 year old. Last week for example, we were home all day Tuesday and she wore panties all day, and went potty in the toilet twice.  The next day, I had school and she insisted on wearing panties to Grandma's house (my mother in law).  With hesitation, I went along with it as I packed extra clothes "just in case."  When I came home that night, my husband, who picks up the kids on the way home from work, announced that she pooped in her panties while she was at Grandma's to which the voice in my head does a very loud "GRRR!"

I've never really had success in potty training kids.  My now 7 year old was trained by a co-day care worker.  I went to work at a day care with my daughter in tow when she was almost 3.  Any attempts before that were met with the same frustration.  In fact, my oldest attempted flushing her clothes down the toilet succeeding with my favorite green shirt with a felt butterfly appliquéd on the front.  Luckily the denim shorts didn't make it.

So inspiration hit me today in the form of a creative outlet.  Kids like to see their reward and know how to get it so I created some bathroom decor for my 3 year old to find more motivation.

Introducing the Potty Pops!


Ingredients (aka supplies):

2x4 cut to about 7 inches
sandpaper
drill
paint
fabric mod podge
fabric cut to 3x7
stencil
double stick tape
sponge brush
suckers (I chose dum dums because they are smaller and it doesn't take her forever to finish them)

After cutting and sanding your block.  Drill holes in the top.  It's fun to do it at different angles, just make sure the holes don't run into each other.  

Paint your block. (I spray painted)

Apply the fabric mod podge to face of block, put your fabric on, let it dry, then seal it with the mod podge.

Create a stencil by finding a font you like, print it out and exacto knife the pieces.  Adhere it to the block with double stick tape, even the middle of the p's and o's.  Or if you have one, just cut vinyl for it, but I feel the stencil makes it look more handmade.


(Yes, this is what I'm doing instead of homework. . . again.)

Once it's dry, it's ready for display.  Now cross our fingers that it works! PS I don't recommend putting this on the counter where little hands can reach on their own.  Find a nice display shelf to put in your bathroom and place it on there.


Don't forget to enter the Giveaway for 2 tickets to Glitter Academy!


Tip Junkie handmade projectsConfessions of a Stay At Home MommyCreations by Kara
Lil' Luna                       Blue Cricket Design


shabby creek cottageCatch a Glimpse ButtonIhookedupwithHoHlamespice
Thirty Hand Made DaysTickled Pink at 504 Main

Tuesday, January 17, 2012

GIVEAWAY!

Welcome to my very first giveaway!  This blog has reached it's first milestone of maintaining over 100 views a day.  So to reward it's readers I've come up with this fantastic giveaway.

One of my favorite things I did last year was attend the Glitter Academy!  What is the Glitter Academy you ask?  It's a fun filled night of crafts, snacks, music, girl talk, and laughter.  The last event was sold out in ONE DAY!  You are going to want to go!


The details of the event are as follows:

Where: Noah's (link to map) in Chandler, AZ
When: Thursday, March 1st, 6:30-11pm
What:  There will be 7 craft tutorials to learn some cool techniques and awesome giveaways throughout the night!
Who: This event is put on by local bloggers from Lil' Luna, I Heart Nap Time, and Somewhat Simple! (Check out their blogs to see how awesome these ladies are!)


So for the giveaway, I'm supplying two tickets to the winner!  That way you can bring a friend, sister, mother, or significant crafty other :)

Here's how to enter:

1.  Follow Mom vs. Design School

2. "Like" Mom vs. Design School on Facebook

3. Follow Lil' Luna,

4. Follow I Heart Nap Time

5. Follow Somewhat Simple

Leave a separate comment with your email for each entry!


Simple as that!  The Giveaway will end on Friday, January 20th, 11:59pm. Winner will be announced and emailed on Saturday.


Good luck!

Wednesday, January 11, 2012

Pottery Barn Finish adventures!

I've always wanted to do an nice satin-y Pottery Barn finish on furniture, but I've been waiting for the right opportunity to do it.  My best friend picked up a couple of dressers from a neighbor for $50 combined!  Awesome deal right?!  She brought them to me and specifically asked for the Pottery Barn finish she heard about from her mom who is a "Pin-head".  I knew exactly what she was talking about since I had pinned the same web site on how to do this particular finish.  Here's the awesome site I went to at Just a Girl.

My adventure began shopping for the Benjamin Moore paint which apparently can only be found at Ace Hardware out here.  Unfortunately, they don't sell this product anymore, then I realized the posted tutorial was over 2 years ago! So I decided to improvise.  The four things that stick out to me that makes this paint amazing is LATEX, LOW LUSTER, INTERIOR,  and ENAMEL. So I headed back to Home Depot (my personal go to) and searched for the next best thing and found my SUPERSTARS for the project.


Product 1: Zinsser Cover Stain, Oil-based (which means it reeks!) Primer (This is tintable!)

Product 2: Behr Premium Plus Ultra, Interior Satin Enamel, Deep Base in Forever Black

If you can find the Benjamin Moore product I'm sure it will do fine, but I found this product as effective and $10 less.


 Before


 After!

Things I would do next time:
- Tint the primer!  I could have saved doing 3 coats of black if the primer wasn't white.  Although I got away with one quart each for the whole project, tinted primer would have been a time saver.
- I would have stuck with 2 hole handles as opposed to going to one.  The hardware was supplied for me by my BFF so I made it work the best I could.  I love the knobs, but the holes left behind are always hard to completely eliminate. If I every perfect this trick, I'll definitely let you know.

Tips I will stick with:
- Use a foam roller and foam brushes.  It really helped with keeping the coats even and consistent. 
- Use a strong degreaser to prep the wood.  Definitely stick with this if you're not going to sand a piece before you work on it.
- Make sure your paint is drying in a room with the right temperature and for the appropriate time.  It didn't happen on this project, but it's always a good tip to stick with.  Every paint can has suggested room temperatures and dry times.  As long as you stick with them you won't run into problems that will make you have to back track on your project.

Good luck if this motivates you enough to do it on your furniture.  Send me a message if you have and questions or send me pics of your finished product!


Linking to:
Confessions of a Stay At Home Mommy Lil' Luna  Blue Cricket Design             
  Catch a Glimpse ButtonCreations by KaraThe 36th Avenue
shabby creek cottageHookingupwithHoHFurniture Feature Fridays Remodelaholic

Thirty Hand Made Days Tickled Pink at 504 Main  A Little Inspiration

Tuesday, January 10, 2012

Winter Break 2011-12

I deserved this break!  It seems like every winter I get sick enough to put me out for a few days.  I was able to make it through finals this year, but then I crashed for the following weekend to charge my batteries for the Christmas rush.

During December, our heat went out . . . 3 times.  Though the experience was rough, we found the A/C company we'll be using for the rest of our life.  The first time they came out, they worked on our unit until 9 pm so that we would have a warm night.  Good customer service goes a long way.  Other than dipping into our Christmas budget for house repairs, we still were happy to spend time with our family.

School has started for me once again.  On the docket is: Design Development Commercial, Codes (...yeah...), Revit, and Visual Presentation.  On the first day of school, I finally received news about an internship I interviewed for nearly 6 weeks ago. They don't need me :( Oh well, the position wasn't something they were advertising and they were considering fitting me in and finding what duties I would have.  I guess it doesn't work out right now, but there is always other places.

What would my dream job be?  I would love to work as an interior designer for an architectural firm that builds custom homes.  I grew up in a custom home and I loved how different it was from everyones.  I like going into a house and having someone show me around instead of instantly knowing where all the bathrooms and bedrooms are located.  I like to be surprised!

Along with my dream, I would create the layout of my own custom home.  I would love to have near complete control over what goes into my home down to the tiny details from outlets and harware to ceiling heights and elevations.

I'm getting closer to my dream, one quarter at a time.  Although I've received my first rejection, I still feel like the world is my oyster and that I will still be able to accomplish great things in my life.  Resumes went out again yesterday with hope for success.  As for now, I'm happy working in my garage creating beautiful furniture.

Here's to Winter 2012!

Tuesday, January 3, 2012

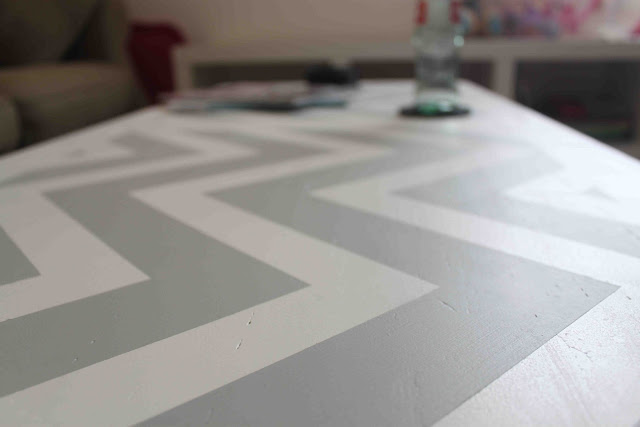
Chevron coffee table

I'm so glad to be working on projects again until school starts next week.  Here's the first to be finished although there are about 8 more pieces in my garage to work on. 


Making chevrons, I found, is a mathematical dream. It's all about midpoints and right angles.  So get out your T-square, your 30-60-90 triangle, measuring tape, and pencil.  You'll be needing them to recreate this vintage look.


Currently FOR SALE - SOLD!

(Find my contact information in the tab above)


Linking up:


HookingupwithHoHshabby creek cottageCatch a Glimpse Button


A Little Inspiration504 Main